
How to design an Adaptive card to receive multiple responses from team message for SharePoint list items?
Use Case
In this article, I will demonstrate the process of designing an adaptive card that can be shared on teams to capture responses from users. We will be sharing list of items with users and capture the responses to update those SharePoint list items using Power Automate.
Scenario
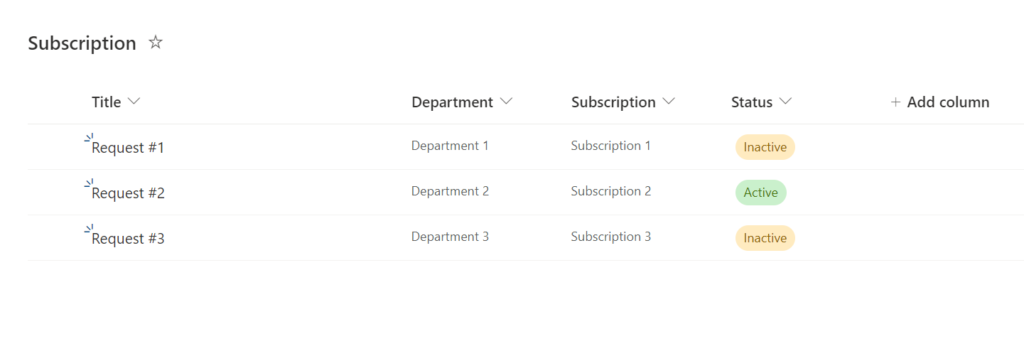
We have a custom SharePoint list ‘Subscription’ that stores the data. We will get the list of inactive subscription on the teams channel and update the responses back in SharePoint list when user submits it. We will be presenting a list of inactive items with choice to select for the users to respond.
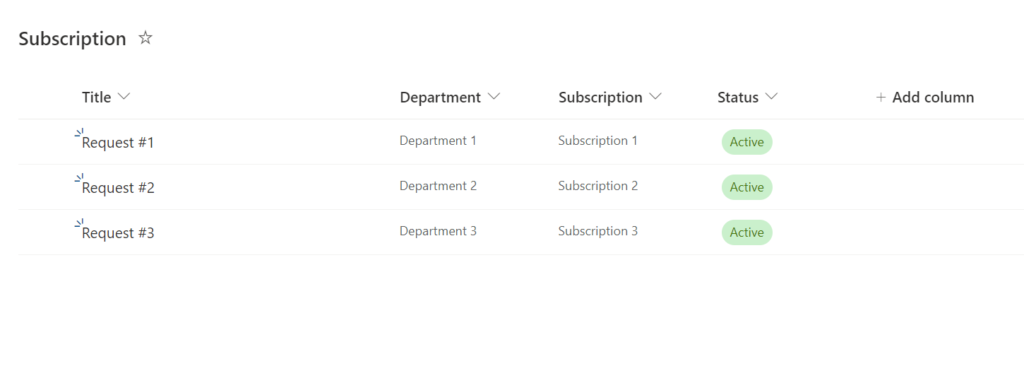
Current list items in SharePoint list:
Solution
1. Firstly, we will get the inactive subscription from SharePoint list using “Get items” action. Apply filter query to get the required list items:
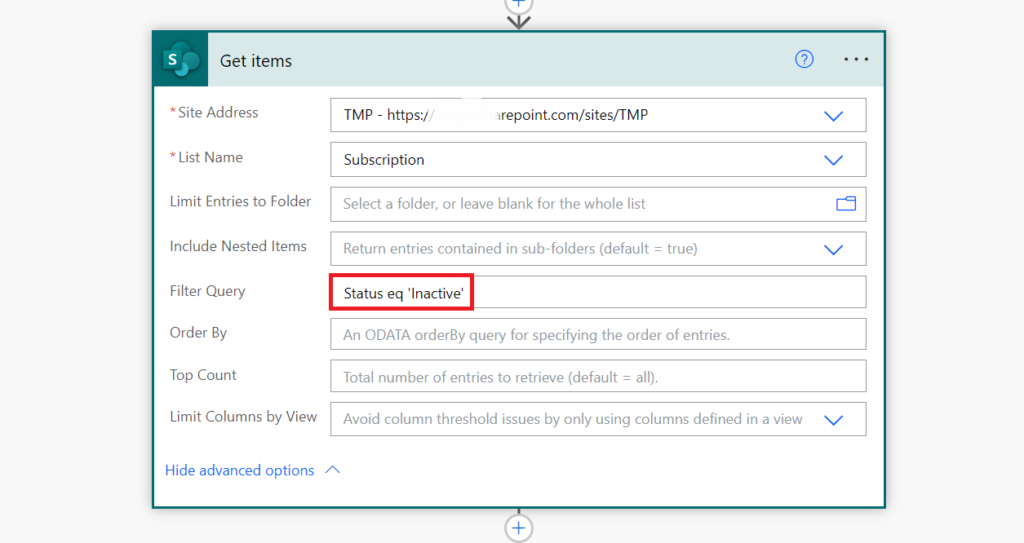
Status eq 'Inactive'2. Next, add “Select” action to create the JSON code for the list which are to be shared on teams channel. Pass the value object from “Get item” in ‘From’ parameter:
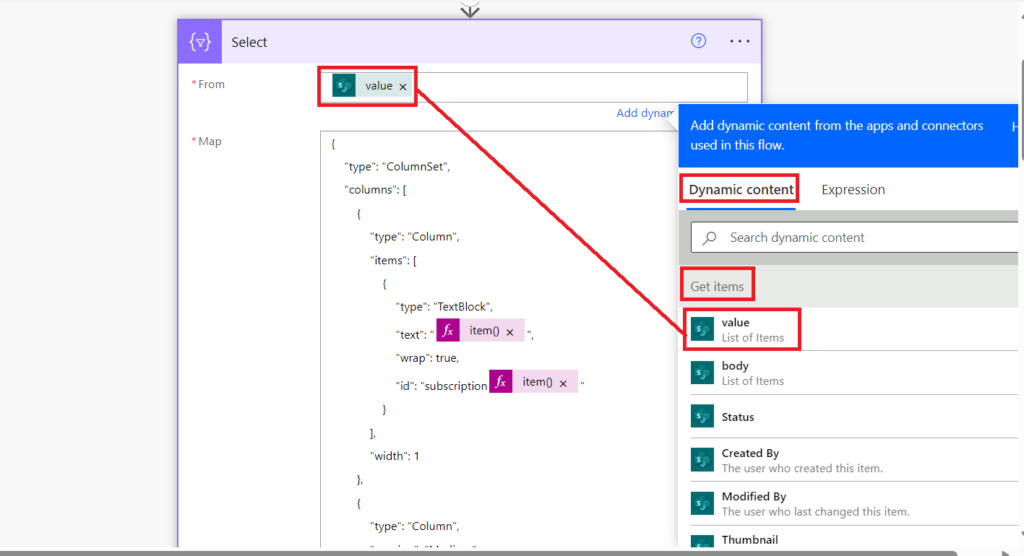
Before entering the JSON code, click ‘Switch Map to text mode’ to get the full textbox for ‘Map’ parameter and enter the below code in that textbox. We are inserting ID value for each property to make the IDs unique in JSON. For item id, we are using ‘ItemId-‘ as the prefix which would be helpful later when we fetch the responses:
{
    "type": "ColumnSet",
    "columns": [
        {
            "type": "Column",
            "items": [
                {
                    "type": "TextBlock",
                    "text": "@{item()?['Subscription']}",
                    "wrap": true,
                    "id": "subscription@{item()?['ID']}"
                }
            ],
            "width": 1
        },
        {
            "type": "Column",
            "spacing": "Medium",
            "items": [
                {
                    "type": "TextBlock",
                    "text": "@{item()?['Department']}",
                    "wrap": true,
                    "id": "department@{item()?['ID']}"
                }
            ],
            "width": 1
        },
        {
            "type": "Column",
            "spacing": "Medium",
            "items": [
                {
                    "type": "Input.ChoiceSet",
                    "id": "@{concat('ItemId-',item()?['ID'])}",
                    "style": "expanded",
                    "isRequired": true,
                    "errorMessage": "This is a required input",
                    "choices": [
                        {
                            "title": "Yes",
                            "value": "True"
                        },
                        {
                            "title": "No",
                            "value": "False"
                        }
                    ]
                }
            ],
            "width": 1
        }
    ]
}
3. Add “Compose” action to dynamically create JSON for the adaptive card. We will pass the output of previous “Select” action in the items of the container for rendering the list:
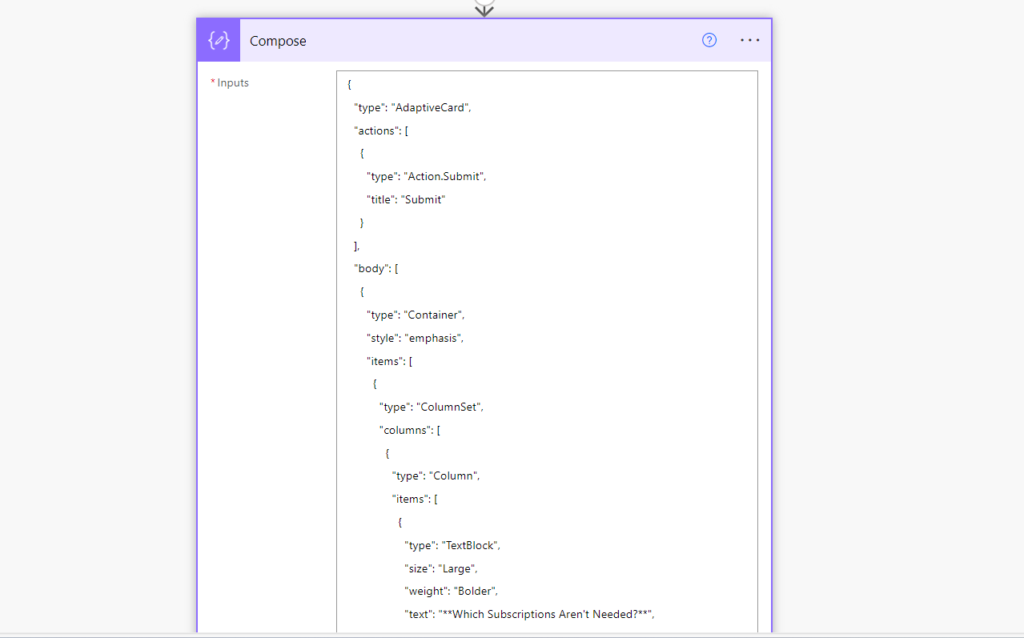
Enter the below JSON in the value of “Compose” action:
{
  "type": "AdaptiveCard",
  "actions": [
    {
      "type": "Action.Submit",
      "title": "Submit"
    }
  ],
  "body": [
    {
      "type": "Container",
      "style": "emphasis",
      "items": [
        {
          "type": "ColumnSet",
          "columns": [
            {
              "type": "Column",
              "items": [
                {
                  "type": "TextBlock",
                  "size": "Large",
                  "weight": "Bolder",
                  "text": "**Which Subscriptions Aren't Needed?**",
                  "style": "heading",
                  "wrap": true
                }
              ],
              "width": "stretch"
            }
          ]
        }
      ],
      "bleed": true
    },
    {
      "type": "Container",
      "spacing": "Large",
      "style": "emphasis",
      "items": [
        {
          "type": "ColumnSet",
          "columns": [
            {
              "type": "Column",
              "items": [
                {
                  "type": "TextBlock",
                  "weight": "Bolder",
                  "text": "SUBSCRIPTION",
                  "wrap": true
                }
              ],
              "width": "stretch"
            },
            {
              "type": "Column",
              "spacing": "Large",
              "items": [
                {
                  "type": "TextBlock",
                  "weight": "Bolder",
                  "text": "DEPARTMENT",
                  "wrap": true
                }
              ],
              "width": "auto"
            },
            {
              "type": "Column",
              "spacing": "Large",
              "items": [
                {
                  "type": "TextBlock",
                  "weight": "Bolder",
                  "text": "Subscription Used?",
                  "wrap": true
                }
              ],
              "width": "auto"
            }
          ]
        }
      ],
      "bleed": true
    },
    {
      "type": "Container",
      "items": @{body('Select')}
    }
  ],
  "$schema": "http://adaptivecards.io/schemas/adaptive-card.json",
  "version": "1.4",
  "fallbackText": "This card requires Adaptive Cards v1.5 support to be rendered properly."
}
I recommend using online Adaptive card designer for designing cards. Here is the link: Designer | Adaptive Cards
Note: Please note that you can post a message up to size limit approximately 28 KB as per the action limitation. For more details, please refer this link Microsoft Teams – Connectors | Microsoft Learn
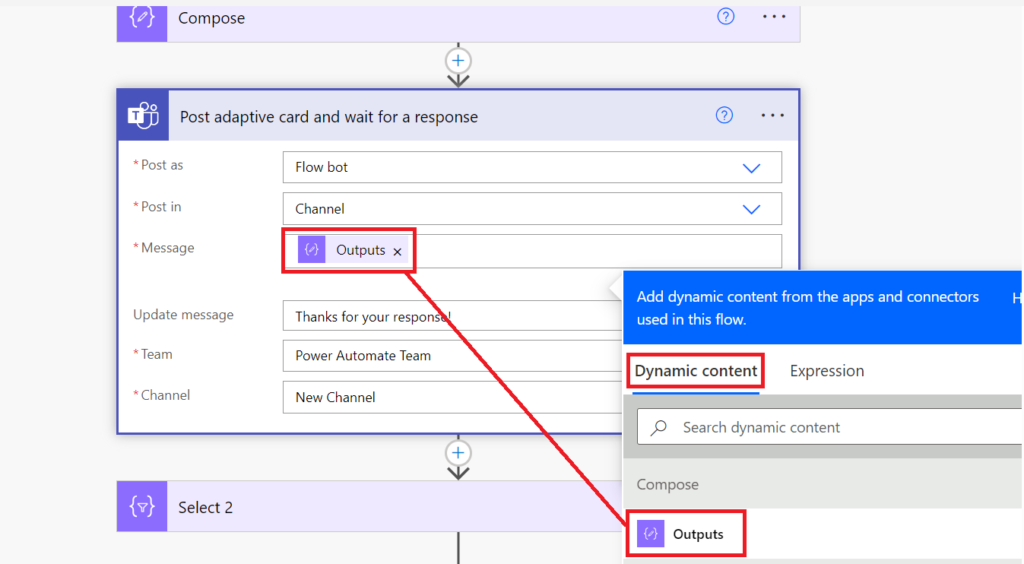
4. Post creating card, add “Post adaptive card and wait for a response” action to post the card on teams channel. Set the teams & channel input parameters and pass output of compose action in the ‘Message’ parameter:
5. We will transform the body/data object returned from the teams message. We will be creating an array object from response using “Select” object. Each element will contain the ID of list item & checkbox value for the corresponding item (response). Pass the value object array from the “Get items” action in ‘From’ parameter:
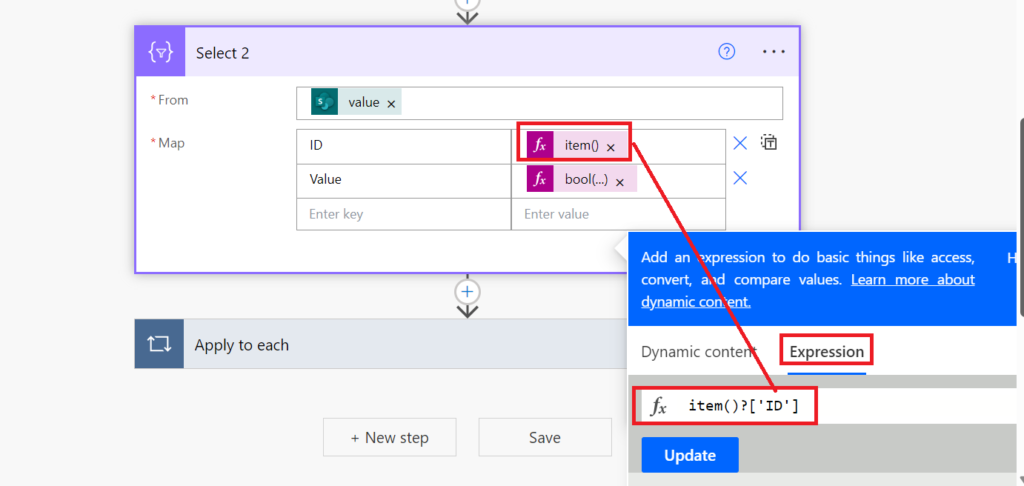
We will be using expression to create an object which will be required in updating the SharePoint items. Expression needs to be entered in the expression box as highlighted in the above screenshot:
Below are the Map key/value parameters values:
| Key | value |
| ID | item()?[‘ID’] |
| Value | bool(xpath(xml(json(concat(‘{“root”:{“items”:’,body(‘Post_adaptive_card_and_wait_for_a_response’)?[‘data’],’}}’))),concat(‘string(//root/items/ItemId-‘,item()?[‘ID’],’)’))) |
6. Finally, we will update the items in SharePoint after getting response from teams message. Add “Apply to each” action to iterate the elements in “Select 2” action. Pass the output of previous action (Select 2) as input:
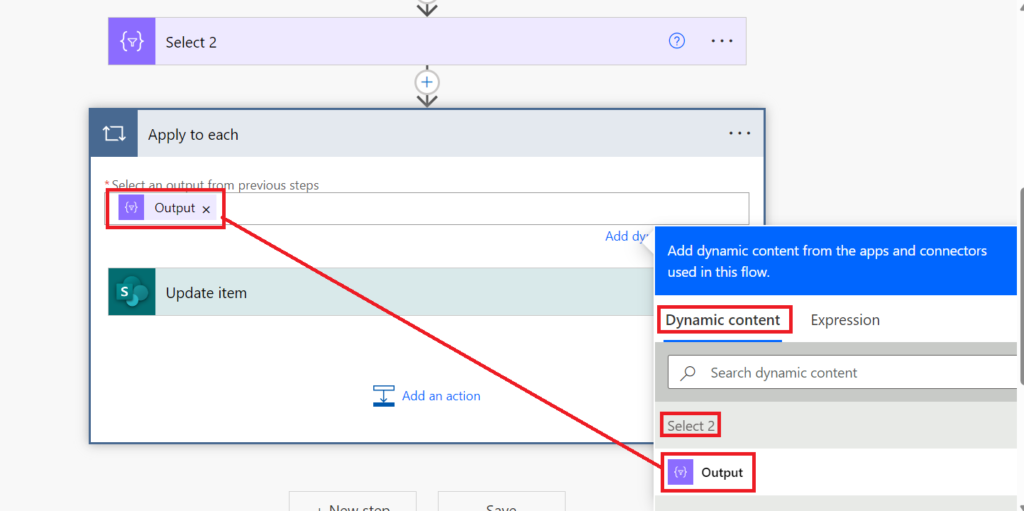
Inside “Apply to each” block, add “Update item” to update the list items based on the response received from users. We will be using expressions for ‘ID’ & ‘Status’ column for each item:
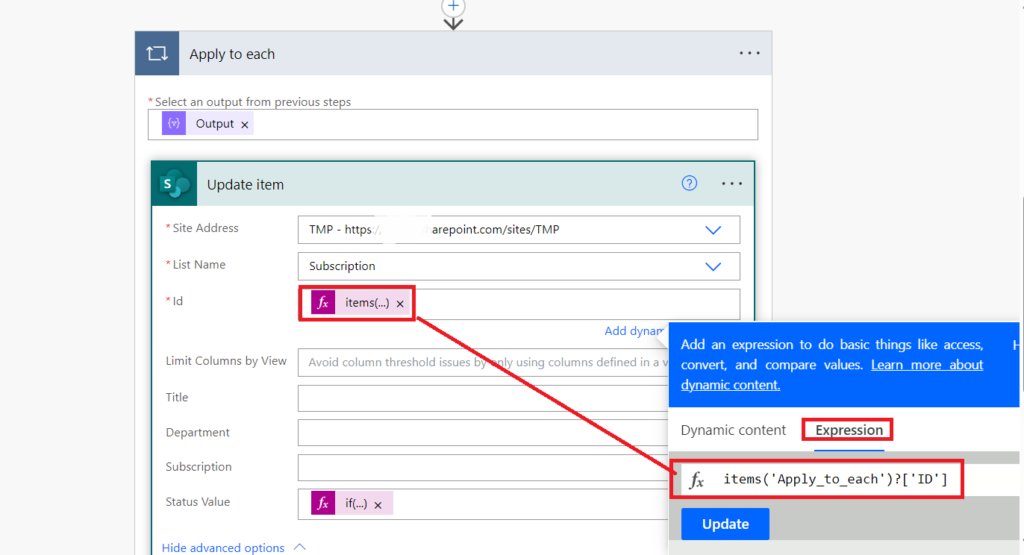
Expression used for ‘ID’ parameter:
items('Apply_to_each')?['ID']Expression used for ‘Status Value’ parameter:
if(items('Apply_to_each')?['Value'],'Active','Inactive')Output
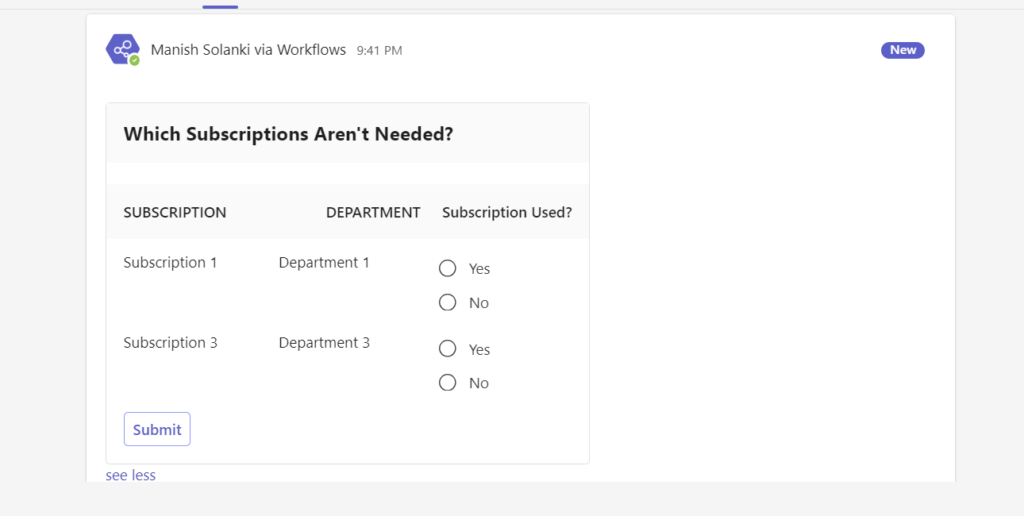
When flow posted a message on teams channel, the adaptive will ask users to choose the subscription:
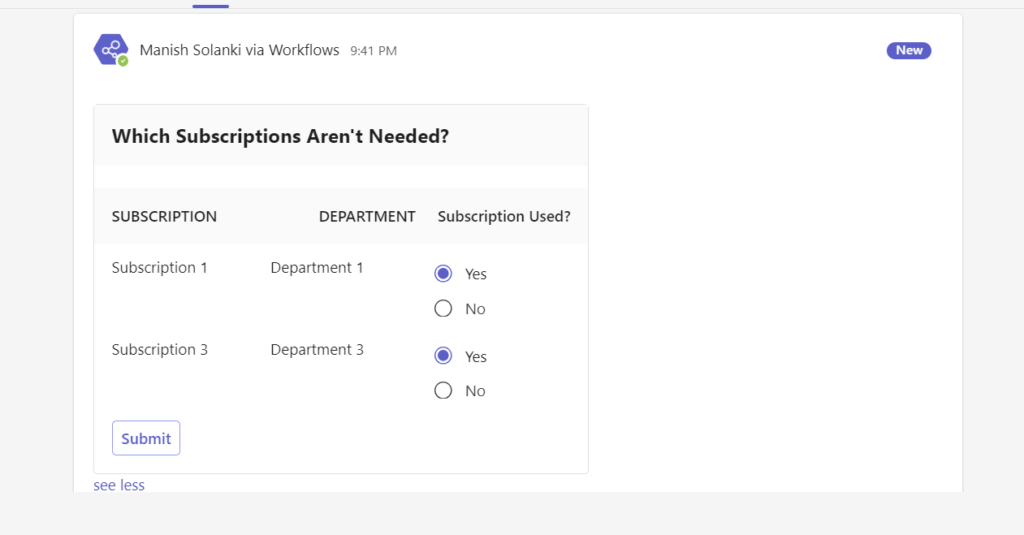
When user submit the response by selecting Yes/No choice and click ‘Submit’ button:
Please note that this card has been tested on MS team web only.
Once flow is complete, the list items Status have been updated as shown below:
Conclusion
We can design adaptive card for getting the responses for list of items. Using this technique, we could share the list of items for getting:
- Approvals
- Reminders
- Surveys
- Feedback
- Task checklist for items
Dan Parkins
Hi Manish.
How do always seem to know what I need to know to solve my problems? Great post Bro!
I’m going to dive into this later this evening.
Manish Solanki
Hi Dan,
Always happy to help! I am glad that this post solves your problem 🙂
Thank you!